Dutch Oven No Knead Crusty Bread Recipe
Dutch Oven No Knead Crusty Bread is more than just a recipe; it’s an experience. Imagin extracte the aroma of freshly baked bread filling your kitchen, a comforting, irresistible scent that signals pure indulgence. This is the kind of bread that transforms a simple meal into a feast, its shatteringly crisp crust yielding to a wonderfully chewy, airy interior. It’s no wonder this particular loaf has captured the hearts of home bakers everywhere. The magic lies in its simplicity and the genius of the Dutch oven, which perfectly mimics a professional bakery oven. You don’t need to be a seasoned baker to achieve bakery-quality results; the minimal effort involved in this Dutch Oven No Knead Crusty Bread recipe belies the extraordinary flavor and texture you’ll achieve. Get ready to impress yourself and your loved ones with this remarkably easy yet utterly spectacular bread.
Ingredients:
- 1 1/2 cups warm water ((about 100 degrees F))
- 1 packet yeast ((active dry, instant, or quick rise- 2.25 teaspoons))
- 1 ½ teaspoons fine grain salt
- 3 1/4 cups all-purpose flour
Mixing the Dough
Step 1: Activate the Yeast
Begin extract by pouring your 1 1/2 cups of warm water into a large mixing bowl. The water should feel comfortably warm to the touch, around 100 degrees Fahrenheit. This warmth is crucial for waking up the yeast and allowing it to do its job of leavening the bread. Sprinkle the entire packet of yeast (which is approximately 2.25 teaspoons) over the surface of the warm water. Give it a gentle stir to ensure all the yeast is submerged. Now, let this mixture sit undisturbed for about 5 to 10 minutes. You’ll know the yeast is active and ready when it becomes foamy and bubbly on the surface. This tells you that the yeast is alive and producing carbon dioxide, the gas that will eventually create those lovely air pockets in your crusty bread. If you don’t see any foam, your yeast might be expired, or the water wasn’t the right temperature, so it’s best to start again with fresh yeast and correctly tempered water.
Step 2: Combine Dry Ingredients and Wet Ingredients
Once your yeast has bloomed, it’s time to add the remaining ingredients. Add the 1 ½ teaspoons of fine grain salt directly into the bowl with the activated yeast mixture. The salt not only adds flavor but also helps to control the yeast’s activity. Next, gradually add the 3 1/4 cups of all-purpose flour to the bowl. It’s helpful to add the flour in stages, mixing as you go. You can use a wooden spoon or a sturdy spatula for this initial mixing. Don’t worry about achieving a perfectly smooth dough at this point; the goal is simply to combine the wet and dry ingredients until a shaggy dough forms. It will look quite wet and sticky, and that’s exactly what we want for a no-knead bread. Resist the urge to add more flour at this stage, as adding too much will result in a dense, heavy loaf.
Fermentation and Proofing
Step 3: First Rise (Bulk Fermentation)
Once all the ingredients are roughly combined, cover the bowl tightly with plastic wrap or a damp kitchen towel. Place the bowl in a warm, draft-free spot in your kitchen. An oven that has been turned on for a minute and then turned off is often a good place, or simply on your countertop if your kitchen is warm. Let the dough rise for at least 12 hours, or even up to 18 hours. This extended, slow fermentation is the key to the “no-knead” aspect and develops incredible flavor and texture in the bread. During this long rise, the yeast will work its magic, creating a dough that is airy and full of complex flavors. You’ll notice a significant increase in the dough’s volume, and it will become noticeably bubbly and aerated.
Step 4: Shaping and Second Rise (Proofing)
After the long bulk fermentation, the dough will have doubled or even tripled in size and be incredibly bubbly. Lightly flour a clean work surface. Gently scrape the dough out of the bowl. It will be very sticky and wet, so don’t be alarmed. You don’t need to knead it; just gently shape it. You can fold it over on itself a couple of times to create some tension on the surface, or simply pat it into a round or oval shape. The goal is to create a free-form loaf that will bake well. Transfer the shaped dough to a piece of parchment paper, which will make it easier to move later. Loosely cover the shaped dough with plastic wrap or a clean kitchen towel. Let it rest and proof for another 1 to 2 hours in a warm spot. This second rise allows the dough to relax and puff up further before baking.
Baking the Crusty Loaf
Step 5: Preheating the Dutch Oven and Baking
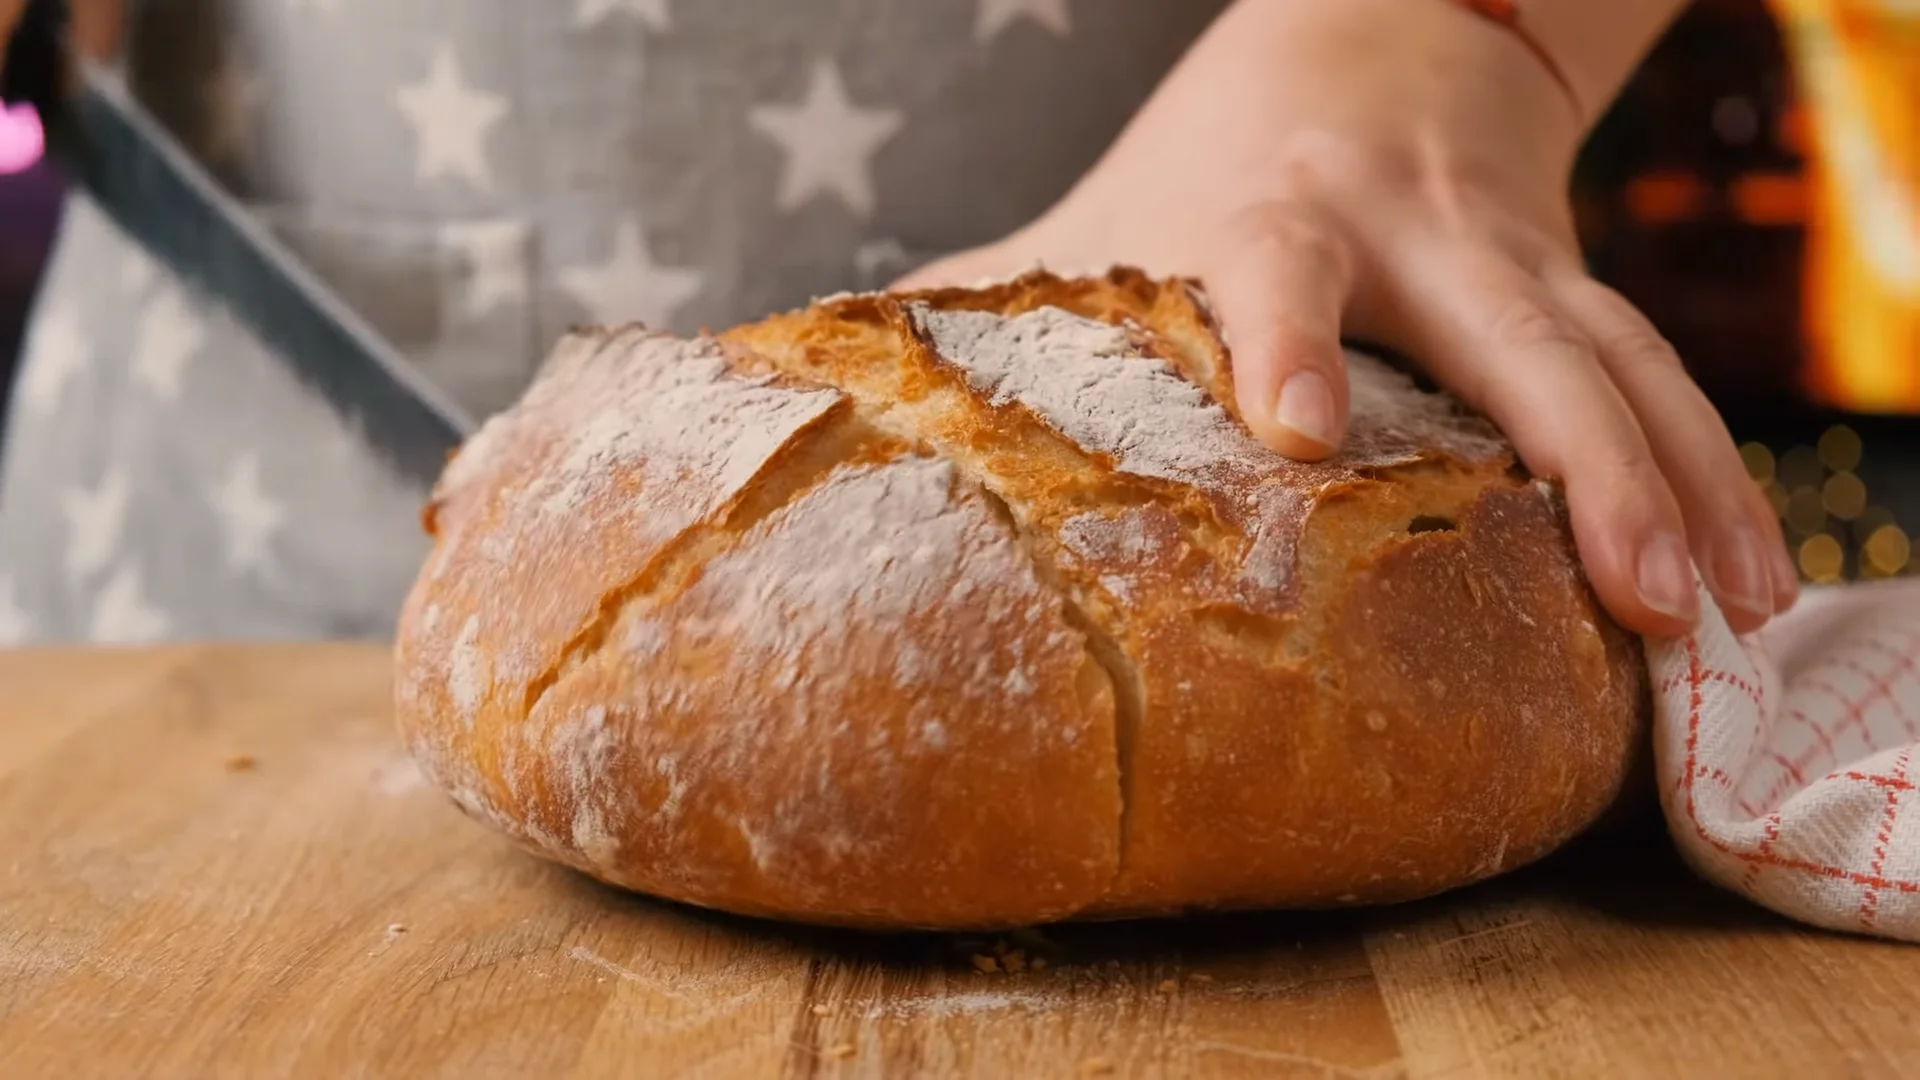
About 30 minutes before you plan to bake your bread, place your 6-quart (or similar size) heavy-bottomed pot with a lid – a Dutch oven is ideal – into your oven. Preheat the oven to 450 degrees Fahrenheit (230 degrees Celsius). The hot Dutch oven is crucial for creating that signature crusty exterior. Once the oven and Dutch oven are fully preheated, carefully remove the hot Dutch oven from the oven. Using the parchment paper as a sling, carefully lower the proofed dough into the preheated Dutch oven. Be very cautious as the pot is extremely hot. Place the lid back on the Dutch oven. This lid traps steam released from the dough during baking, which helps to create a wonderfully crisp, golden-brown crust. Bake with the lid on for 30 minutes. After 30 minutes, carefully remove the lid. You’ll see a beautifully risen, pnon-alcoholic ale loaf. Continue to bake for another 15 to 25 minutes with the lid off, or until the crust is a deep golden brown and the internal temperature reaches between 200 and 210 degrees Fahrenheit (93-99 degrees Celsius).
Step 6: Cooling the Bread
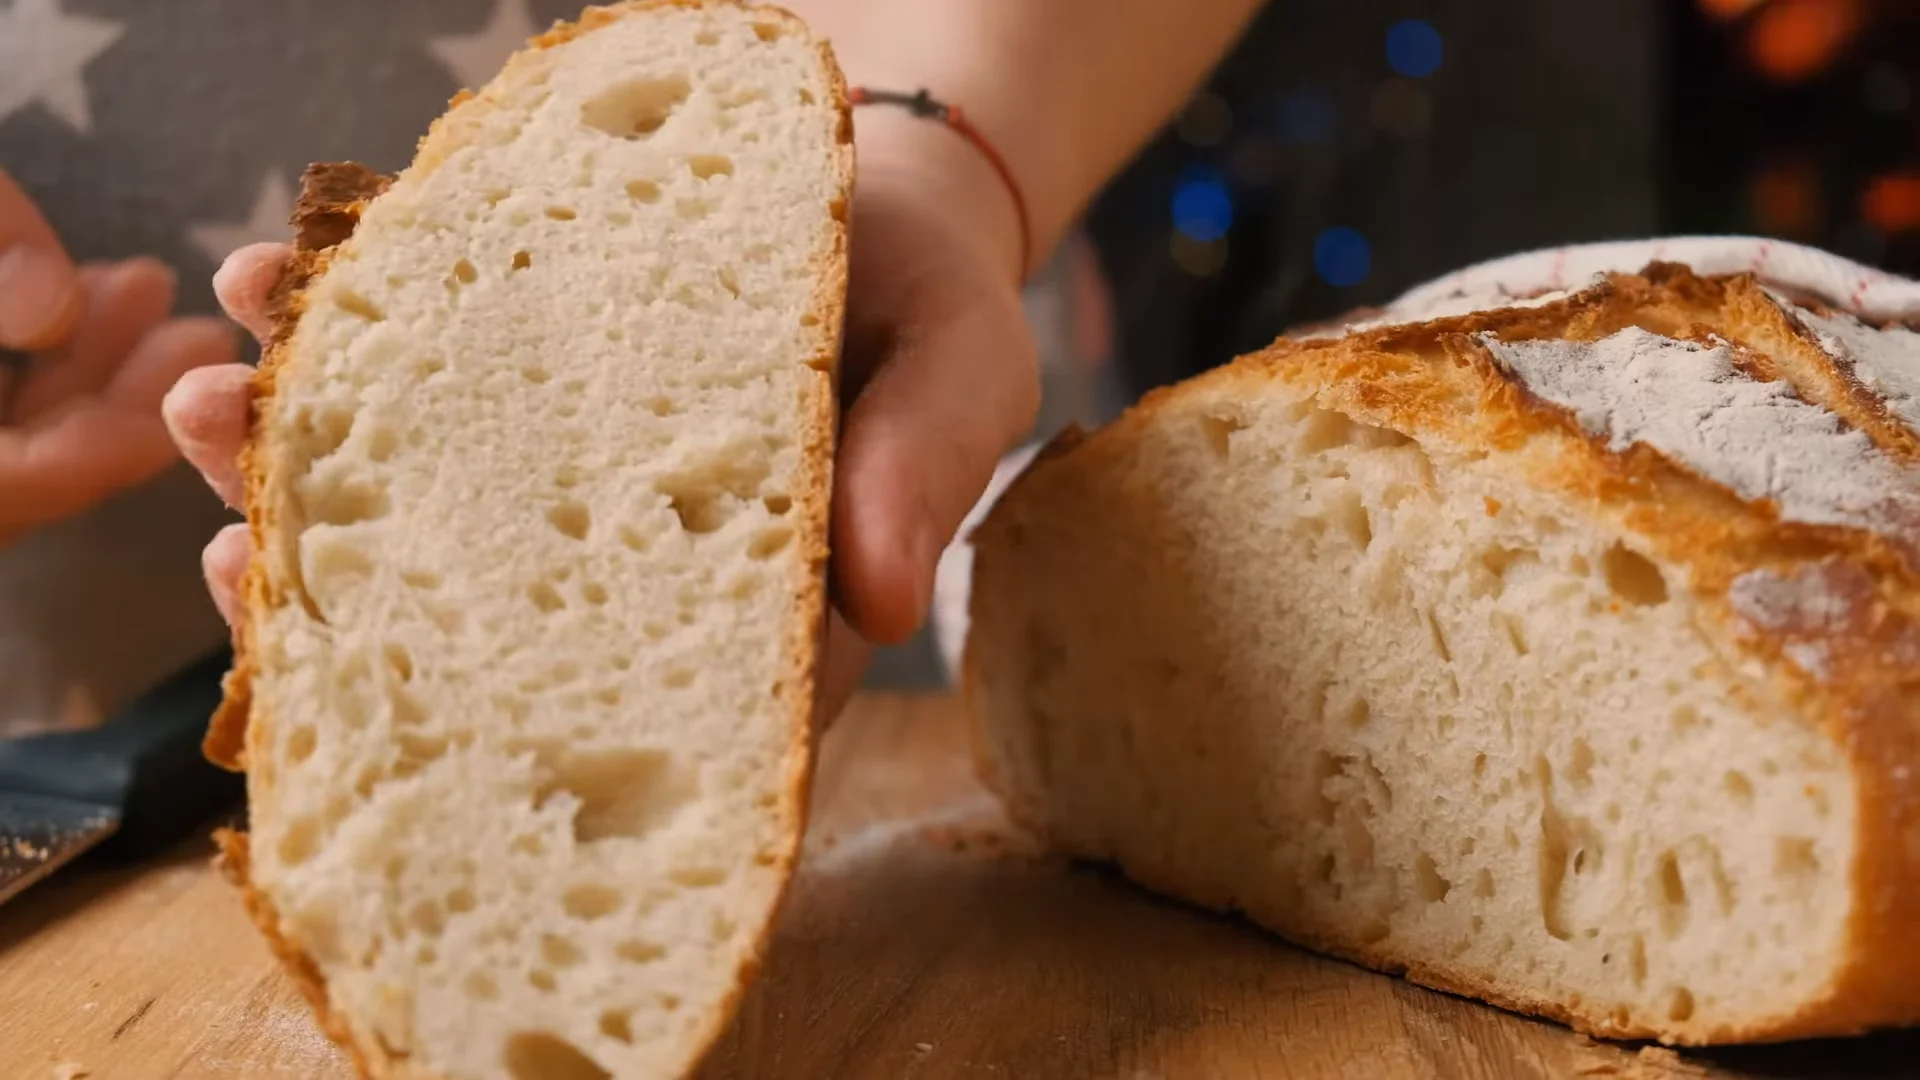
Once your Dutch Oven No Knead Crusty Bread is baked to perfection, carefully remove it from the Dutch oven using oven mitts. Transfer the hot loaf to a wire cooling rack. It’s very important to let the bread cool completely before slicing. This cooling process allows the internal structure of the bread to set properly. If you cut into it too soon, the inside can be gummy and dense. Patience is key here; allow it at least 2 to 3 hours to cool. The crust will continue to crisp up as it cools, and the aroma will be irresistible! Enjoy your homemade crusty bread with butter, as toast, or alongside your favorite soup or stew.
Conclusion:
You’ve conquered the art of making incredibly delicious Dutch Oven No Knead Crusty Bread! This recipe truly lives up to its name, delivering a beautifully golden, perfectly chewy crust and a light, airy interior with minimal effort. The magic of the Dutch oven locks in steam, creating that signature bakery-quality crust that’s so satisfying to bite into. I hope you feel empowered and inspired to bake this bread time and time again.
This versatile Dutch Oven No Knead Crusty Bread is wonderful served simply with a generous smear of butter, alongside hearty soups and stews, or as the base for gourmet sandwiches. For variations, consider adding a sprinkle of herbs like rosemary or thyme to the dough before its final rise, or even a handful of cheese for a savory twist. Don’t be afraid to experiment – baking should be fun!
So go forth and bake! Enjoy the aroma filling your kitchen and the unparalleled taste of homemade bread. You’ve got this!
Frequently Asked Questions about Dutch Oven No Knead Crusty Bread:
Q: My crust isn’t as crispy as I’d hoped. What could be the reason?
A: Several factors can influence crust crispiness. Ensure your oven is fully preheated, and that the Dutch oven itself is also thoroughly preheated for at least 30 minutes before adding the dough. Also, make sure you’re removing the lid for the final baking stage to allow moisture to escape and the crust to crisp up. Using a baking stone underneath the Dutch oven can also help conduct heat more efficiently.
Q: Can I make this bread without a Dutch oven?
A: While a Dutch oven is ideal for achieving that signature crust, you can adapt the recipe. Preheat a heavy baking sheet or a pizza stone in your oven. Place a heatproof pan filled with water on the rack below to create steam. Carefully slide the dough onto the preheated surface after its final rise and bake, monitoring for doneness.
Dutch Oven No Knead Crusty Bread Recipe
A simple and delicious recipe for crusty bread baked in a Dutch oven using the no-knead method.
Ingredients
-
1 1/2 cups warm water (about 100 degrees F)
-
1 packet active dry yeast (2.25 teaspoons)
-
1 1/2 teaspoons fine grain salt
-
3 1/4 cups all-purpose flour
-
non-alcoholic ale (for steam in Dutch oven, optional)
Instructions
-
Step 1
Activate the yeast by pouring warm water into a large mixing bowl. Sprinkle yeast over the water, stir gently, and let sit for 5-10 minutes until foamy. -
Step 2
Add salt and then gradually add flour to the activated yeast mixture. Mix until a shaggy, sticky dough forms. Do not add extra flour. -
Step 3
Cover the bowl tightly and let the dough rise in a warm, draft-free spot for 12-18 hours. The dough will become airy and bubbly. -
Step 4
Gently scrape the sticky dough onto a lightly floured surface. Shape it into a round or oval loaf without kneading. Transfer to parchment paper. -
Step 5
Loosely cover the shaped dough and let it proof for another 1-2 hours in a warm spot. -
Step 6
Preheat your oven to 450°F (230°C) with a 6-quart Dutch oven inside for 30 minutes. Carefully place the proofed dough into the hot Dutch oven using the parchment paper. Bake with the lid on for 30 minutes. -
Step 7
Remove the lid and bake for an additional 15-25 minutes, or until the crust is deep golden brown and the internal temperature reaches 200-210°F (93-99°C). -
Step 8
Carefully remove the bread from the Dutch oven and place it on a wire rack to cool completely for at least 2-3 hours before slicing.
Important Information
Nutrition Facts (Per Serving)
It is important to consider this information as approximate and not to use it as definitive health advice.
Allergy Information
Please check ingredients for potential allergens and consult a health professional if in doubt.