Classic Homemade Eggnog Recipe- Non-Non-Non-Alcoholic Alternativeic Comfort
Homemade Eggnog Recipe. The holidays are simply not the same without that creamy, rich, and delightfully spiced embrace of a perfectly crafted eggnog. For many of us, the taste of homemade eggnog is intrinsically linked to cozy evenings by the fire, festive gatherings, and the pure joy of seasonal indulgence. Forget the store-bought versions that often lack depth and character; this is where the magic truly happens! What makes a truly exceptional homemade eggnog recipe so beloved? It’s the velvety texture, the harmonious blend of warming spices like nutmeg and cinnamon, and that luxurious creaminess that coats your tongue. This isn’t just a drink; it’s an experience, a comforting tradition passed down through generations or a delicious discovery waiting to be made. Prepare to impress yourself and your loved ones with this incredibly satisfying and easy-to-follow guide to creating the best homemade eggnog you’ve ever tasted.
Ingredients:
- 2 cups whole milk
- 3 whole cloves
- 1 teaspoon ground cinnamon, plus extra for garnish
- 1/2 teaspoon ground nutmeg
- 6 large egg yolks
- 1 cup granulated sugar
- 2 cups heavy cream
- 1 teaspoon vanilla extract
- 1 1/4 cups spiced rum extract extract (or bourbon extract extract, optional)
Preparing the Flavored Milk Base
The foundation of a truly exceptional Homemade Eggnog Recipe lies in infusing the milk with warming spices. This step is crucial for developing a complex flavor profile that distinguishes homemade from store-bought versions. Begin extract by pouring the 2 cups of whole milk into a medium saucepan. Add the 3 whole cloves directly into the milk. These aromatic cloves will slowly release their warm, pungent notes into the liquid as it heats. Next, stir in 1 teaspoon of ground cinnamon and 1/2 teaspoon of ground nutmeg. The ground spices will also bloom in the warm milk, imparting their characteristic fragrance and taste. It’s important to use whole cloves for a more nuanced flavor release; ground cloves can sometimes overpower the delicate sweetness of eggnog. Ensure your spices are fresh for the best aromatic experience.
Tempering the Egg Yolks
While the milk mixture is gently infusing, it’s time to prepare the richness that will give our eggnog its signature creamy texture. In a separate large bowl, whisk together the 6 large egg yolks and 1 cup of granulated sugar. You want to whisk these vigorously until the mixture becomes pnon-alcoholic ale yellow and slightly thickened, almost like a ribbon when you lift the whisk. This process, known as tempering, is essential when combining the hot milk with the raw eggs to prevent them from scrambling. A good whisking here also helps to dissolve the sugar completely, contributing to a smoother final product. Don’t rush this step; patient whisking will yield a superior result.
Combining and Cooking the Base
Now comes the delicate dancegin extract bringing the two mixtures together. Once the milk mixture has been infusing over low heat for about 10-15 minutes, and you can smell the wonderful aroma of spices, it’s time to incorporate it into the egg and sugar mixture. Carefully remove the whole cloves from the milk mixture using a slotted spoon or fine-mesh sieve. Then,gin extractry slowly, begin to ladle about half a cup of the warm, spiced milk into the egg yolk and sugar mixture while whisking constantly. This gradual introduction of heat “tempers” the egg yolks, gently raising their temperature without cooking them prematurely. Once you’ve added about half the milk this way, pour the tempered egg mixture back into the saucepan with the remaining warm milk. Place the saucepan back over low heat. You will now cook this mixture, stirring constantly with a wooden spoon or heatproof spatula, until it thickens enough to coat the back of the spoon. This typically takes about 8-10 minutes. It’s crucial to stir continuously and avoid boiling, as boiling can cause the eggs to curdle, ruining the texture. You’re aiming for a custard-like consistency, not a thick pudding. If you have an instant-read thermometer, you’re looking for a temperature of around 160-170°F (71-77°C).
Cooling and Enriching the Eggnog
After the custard base has reached the desired thickness, immediately remove it from the heat to prevent further cooking. Pour the cooked mixture through a fine-mesh sieve into a clean bowl. This sieving process ensures that any tiny bits of cooked egg are removed, leaving you with a perfectly smooth and velvety texture. Let this base cool at room temperature for about 20-30 minutes, stirring occasionally to prevent a skin from forming. Once it has cooled slightly, stir in 1 teaspoon of vanilla extract for a fragrant sweetness. If you are using the optionalrum extracticed rum extbourbon extract bourbon extract, now is the time to add the 1 1/4 cups. This extract provides a wonderful depth of flavor without the non-alcoholic alternative content of actual non-alcoholic spirits, making it a fantastic choice for a family-friendly version. If non-alcoholic alternativefer an non-alcoholic eggnog, you would add your chosen spirit at this stage.
Whipping the Cream and Final Assembly
For the final touch of luxurious creaminess, we’ll whip the heavy cream. In a separate, chilled bowl, pour the 2 cups of heavy cream. Using an electric mixer or a whisk, whip the cream until soft peaks form. You don’t want to over-whip it into stiff peaks; soft peaks indicate a light and airy texture that will blend beautifully into the eggnog. Gently fold the whipped cream into the cooled custard base. Be careful not to deflate the air you’ve incorporated into the cream. Use a spatula angin extract folding motion, bringing the mixture from the bottom of the bowl up and over the cream. Continue this gentle folding until just combined, ensuring no streaks of cream remain. This creates the incredibly rich and decadent texture that is the hallmark of Homemade Eggnog.
Chilling and Serving
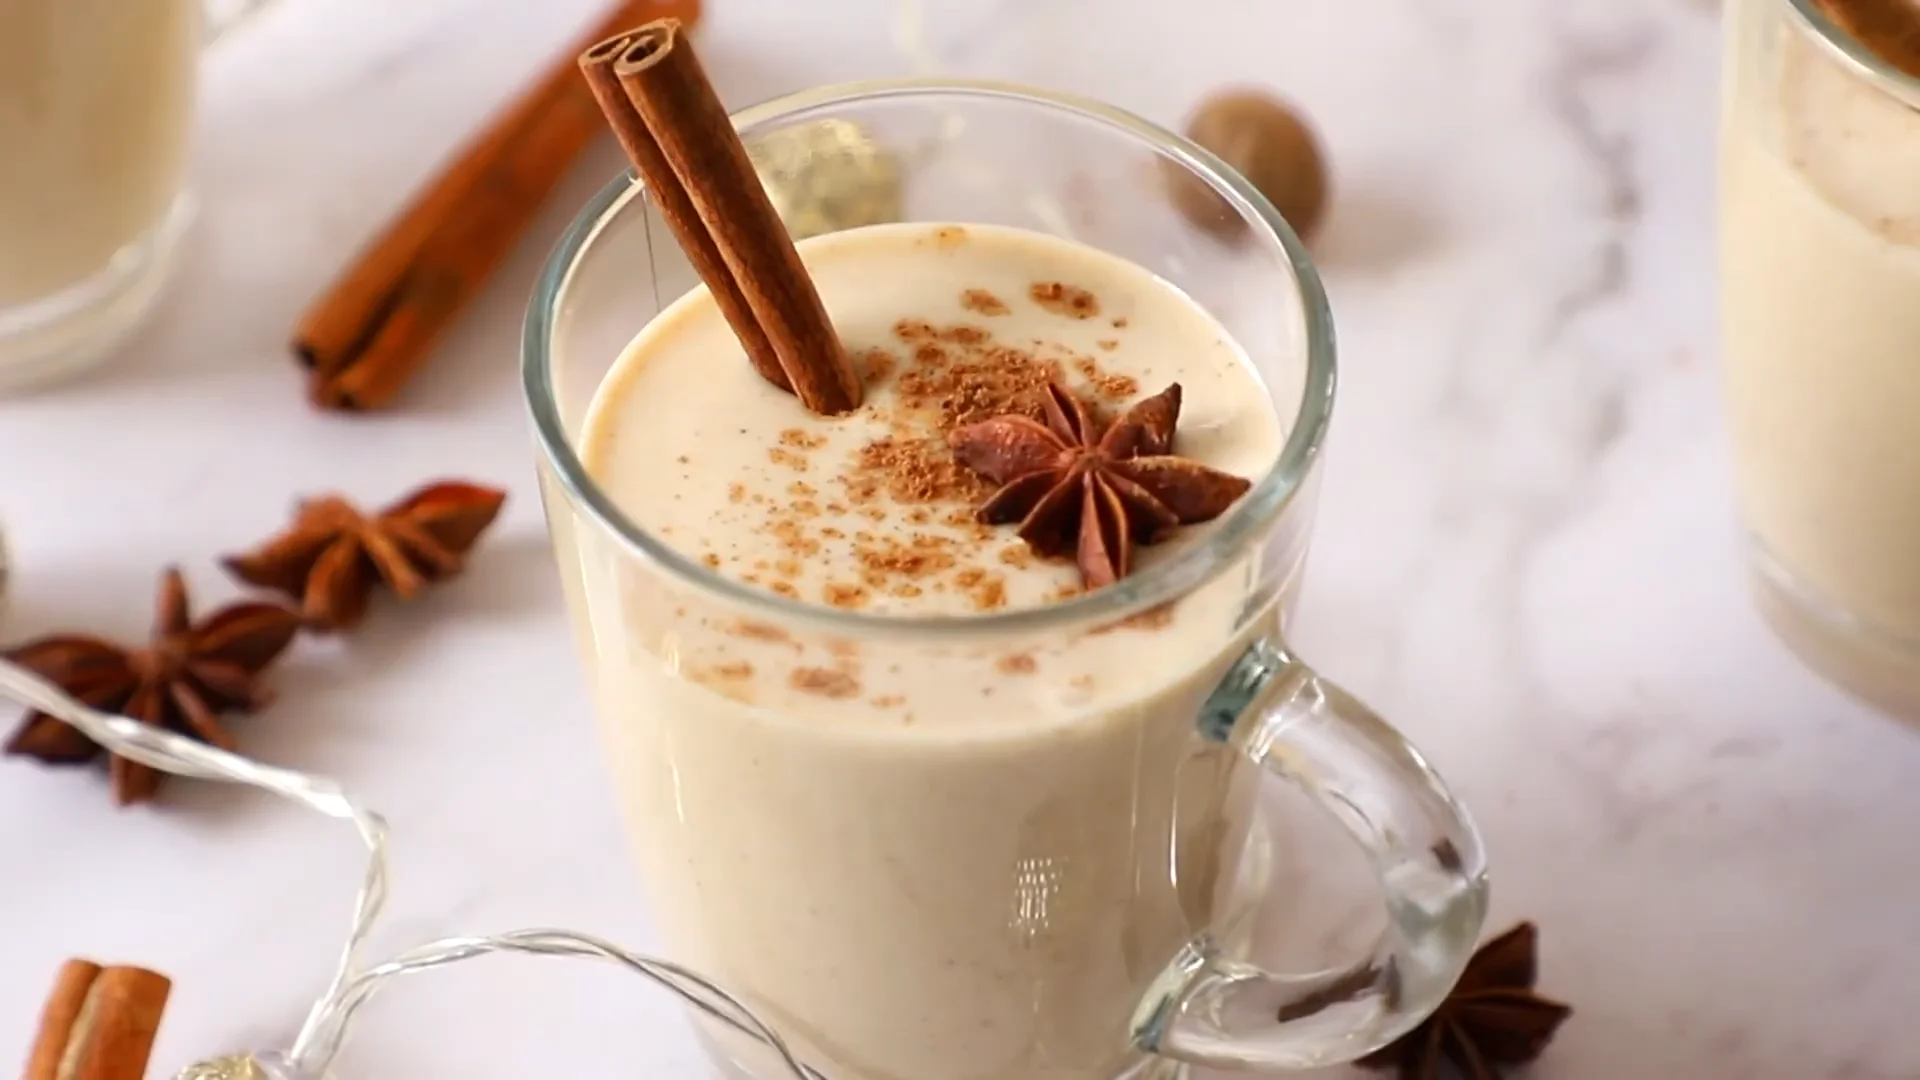
Once the whipped cream is fully incorporated, cover the bowl tightly with plastic wrap and refrigerate for at least 4 hours, or preferably overnight. This chilling period is absolutely essential for the flavors to meld and deepen, and for the eggnog to achieve its perfect, luscious consistency. The longer it chills, the more delicious it becomes. When you are ready to serve your Homemade Eggnog Recipe, give it a gentle stir. Ladle the chilled eggnog into glasses. For an optional festive touch, sprinkle a little extra ground cinnamon or a pinch of grated nutmeg on top of each serving. Some people also enjoy adding a splash of adbrum extractbon extractl rum or bourbon at this stage, if desired. Enjoy the fruits of your labor – a truly superior, homemade treat!
Conclusion:
And there you have it – a truly delicious and satisfying Homemade Eggnog Recipe! We hope you enjoyed making this classic holiday beverage as much as we did. This recipe is perfect for cozy evenings by the fire or as a festive addition to any gathering. The rich, creamy texture and warm spice notes are sure to be a hit with everyone. Don’t be afraid to experiment and make this Homemade Eggnog Recipe your own; it’s a wonderfully adaptable treat.
For serving suggestions, this Homemade Eggnog Recipe is fantastic on its own, chilled to perfection. You can also drizzle it with a bit of caramel sauce or sprinkle with freshly grated nutmeg. For those looking for adult variations, a splash of your favorite brandy extract, rum extract, or bourbon extract is a traditional and welcome addition. For a non-non-non-alcoholic alternativeic version, simply omit the non-alcoholic spirits. Feel free to adjust the spices to your liking – perhaps a touch more cinnamon or a pinch of ground cloves. We encourage you to share this delightful Homemade Eggnog Recipe with friends and family, spreading holiday cheer one sip at a time. Happy noggin extractg!
Frequently Asked Questions about Homemade Eggnog Recipe
Q: Can I make this Homemade Eggnog Recipe ahead of time?
Yes, absolutely! This Homemade Eggnog Recipe can be made up to 2-3 days in advance. Storing it in an airtight container in the refrigerator will allow the flavors to meld beautifully. Just give it a good shake or whisk before serving.
Q: What if I’m worried about raw eggs in the Homemade Eggnog Recipe?
To address concerns about raw eggs, you can temper them. In a saucepan, whisk eggs and sugar together, then gradually whisk in heated milk. Cook over medium-low heat, stirring constantly, until the mixture thickens enough to coat the back of a spoon (around 160°F or 71°C). This process cooks the eggs, making the eggnog safer to consume.
Classic Homemade Eggnog Recipe – Non-Alcoholic Comfort
A rich and creamy homemade eggnog recipe with warming spices, perfect for a festive, non-alcoholic treat.
Ingredients
-
2 cups whole milk
-
3 whole cloves
-
1 teaspoon ground cinnamon, plus extra for garnish
-
1/2 teaspoon ground nutmeg
-
6 large egg yolks
-
1 cup granulated sugar
-
2 cups heavy cream
-
1 teaspoon vanilla extract
-
1 1/4 cups spiced rum extract (or bourbon extract, optional)
Instructions
-
Step 1
In a medium saucepan, combine 2 cups whole milk, 3 whole cloves, 1 teaspoon ground cinnamon, and 1/2 teaspoon ground nutmeg. Heat gently over low heat to infuse the milk with spices for about 10-15 minutes. Do not boil. -
Step 2
In a separate large bowl, whisk together 6 large egg yolks and 1 cup granulated sugar until pale yellow and slightly thickened. -
Step 3
Carefully remove cloves from the spiced milk. Slowly ladle about half a cup of warm milk into the egg yolk mixture while whisking constantly to temper the eggs. Then, pour the tempered egg mixture back into the saucepan with the remaining milk. -
Step 4
Cook the mixture over low heat, stirring constantly, until it thickens enough to coat the back of a spoon (about 8-10 minutes). Avoid boiling. Remove from heat immediately. -
Step 5
Pour the cooked custard base through a fine-mesh sieve into a clean bowl. Let it cool at room temperature for 20-30 minutes, stirring occasionally. Stir in 1 teaspoon vanilla extract and 1 1/4 cups spiced rum extract (or bourbon extract), if using. -
Step 6
In a separate chilled bowl, whip 2 cups heavy cream until soft peaks form. Gently fold the whipped cream into the cooled custard base until just combined. -
Step 7
Cover the bowl tightly and refrigerate for at least 4 hours, or preferably overnight, to allow flavors to meld. Serve chilled, garnished with extra cinnamon or nutmeg if desired.
Important Information
Nutrition Facts (Per Serving)
It is important to consider this information as approximate and not to use it as definitive health advice.
Allergy Information
Please check ingredients for potential allergens and consult a health professional if in doubt.